

Table of contents
- Basic Selectors:
- 1. Universal selector (*):
- Example −>
- OUTPUT -->
- 2. Type Selector:
- Example -->
- Output -->
- 3. Class Selector:
- Example -->
- HTML:
- CSS:
- OUTPUT -->
- 3. ID Selector:
- Example -->
- HTML:
- CSS:
- OUTPUT -->
- 4. Attribute Selector:
- Example -->
- HTML:
- CSS:
- OUTPUT -->
- Grouping Selector:
- Example -->
- Single Line Grouping:
- Multi Line Grouping:
- Combinator Selector
- 1. Descendant Selector:
- Example -->
- HTML:
- CSS:
- OUTPUT -->
- 2. Child Selector:
- Example -->
- HTML:
- CSS:
- OUTPUT -->
- 3. General Sibling Selector:
- Example -->
- HTML:
- CSS:
- OUTPUT -->
- 4. Adjacent Sibling Selector:
- Example -->
- HTML:
- CSS:
- OUTPUT -->
- Pseudo Selectors
- Example -->
- 1. Before:
- 2. After:
- Thank You!😊Hope you enjoyed the article.
CSS selectors define the elements to which a set of CSS rules apply.
NOTE: There are no selectors or combinators to select parent items, siblings of parents, or children of parent siblings.
Basic Selectors:
1. Universal selector (*):
The CSS * selector is a universal selector which is used to select all elements of the HTML DOM.
Syntax:
* {
   /*declarations*/
}
Example −>
<!DOCTYPE html>
  <html>
    <head>
      <style>
        * {
             margin: 15px;
             padding: 5px;
             border: 2px solid black;
             box-shadow: inset 30px 0 8px lightblue;
         }
      </style>
    </head>
    <body>
      <table>
         <tr>
          <td></td>
          <td></td>
         </tr>
         <tr>
          <td></td>
          <td></td>
          <td></td>
          <td></td>
        </tr>
      </table>
     </body>
</html>
OUTPUT -->
2. Type Selector:
The CSS element type selector is used to select all elements of a type. The syntax for CSS element type selector is as follows
Syntax:
element {
   /*declarations*/
}
Example -->
<!DOCTYPE html>
<html>
  <head>
    <style>
      li {
        text-align: center;
        list-style: none;
        margin: 5px;
        padding: 5px;
        box-shadow: inset 0 0 15px yellowgreen;
      }
      div {
        box-shadow: inset 0 0 8px orange;
        padding: 36px;
        width: 30%;
        border-radius: 50%;
      }
    </style>
  </head>
  <body>
    <div>
      <ul>
        <li>Hello</li>
        <li>Guys</li>
      </ul>
    </div>
  </body>
</html>
Output -->
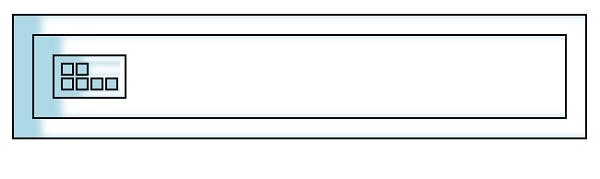
3. Class Selector:
You can define style rules based on the class attribute of the elements. All the elements having that class will be formatted according to the defined rule.
Syntax
.class_name{ style properties }
Example -->
HTML:
<p class="red">This paragraph has red text.</p>
<p class="red yellow-bg">This paragraph has red text and a yellow background.</p>
<p class="red fancy">This paragraph has red text and "fancy" styling.</p>
<p>This is just a regular paragraph.</p>
CSS:
.red {
  color: #f33;
}

.yellow-bg {
  background: #ffa;
}

.fancy {
  font-weight: bold;
  text-shadow: 4px 4px 3px #77f;
}
OUTPUT -->

3. ID Selector:
You can define style rules based on the id attribute of the elements. All the elements having that id will be formatted according to the defined rule.
Syntax
#id_value { style properties }
Example -->
HTML:
<div id="identified">This div has a special ID on it!</div>
<div>This is just a regular div.</div>
CSS:
#identified {
  background-color: skyblue;
}
OUTPUT -->

4. Attribute Selector:
You can also apply styles to HTML elements with particular attributes.
Syntax
[attr] -
Represents elements with an attribute name of attr.
[attr=value] -
Represents elements with an attribute name of attr whose value is exactly value.
[attr~=value] -
Represents elements with an attribute name of attr whose value is a whitespace-separated list of words, one of which is exactly value.
[attr|=value] -
Represents elements with an attribute name of attr whose value can be exactly value or can begin with value immediately followed by a hyphen, - (U+002D). It is often used for language subcode matches.
[attr^=value] -
Represents elements with an attribute name of attr whose value is prefixed (preceded) by value.
[attr$=value] -
Represents elements with an attribute name of attr whose value is suffixed (followed) by value.
[attr*=value] -
Represents elements with an attribute name of attr whose value contains at least one occurrence of value within the string.
[attr operator value i] -
Adding an i (or I) before the closing bracket causes the value to be compared case-insensitively (for characters within the ASCII range).
[attr operator value s] - Experimental
Adding an s (or S) before the closing bracket causes the value to be compared case-sensitively (for characters within the ASCII range).
Example -->
HTML:
<ul>
  <li><a href="#internal">Internal link</a></li>
  <li><a href="http://example.com">Example link</a></li>
  <li><a href="#InSensitive">Insensitive internal link</a></li>
  <li><a href="http://example.org">Example org link</a></li>
  <li><a href="https://example.org">Example https org link</a></li>
</ul>
CSS:
a {
  color: blue;
}

/* Internal links, beginning with "#" */
a[href^="#"] {
  background-color: gold;
}

/* Links with "example" anywhere in the URL */
a[href*="example"] {
  background-color: silver;
}

/* Links with "insensitive" anywhere in the URL,
   regardless of capitalization */
a[href*="insensitive" i] {
  color: cyan;
}

/* Links with "cAsE" anywhere in the URL,
with matching capitalization */
a[href*="cAsE" s] {
  color: pink;
}

/* Links that end in ".org" */
a[href$=".org"] {
  color: red;
}

/* Links that start with "https" and end in ".org" */
a[href^="https"][href$=".org"] {
  color: green;
}
OUTPUT -->

Grouping Selector:
The CSS grouping selector is used to select multiple elements and style them together. This reduces the code and extra effort to declare common styles for each element. To group selectors, each selector is separated by a space.
Syntax
element, element, element { style properties }
Example -->
Single Line Grouping:
h1, h2, h3, h4, h5, h6 { font-family: helvetica; }
Multi Line Grouping:
#main,
.content,
article {
  font-size: 1.1em;
}
Combinator Selector
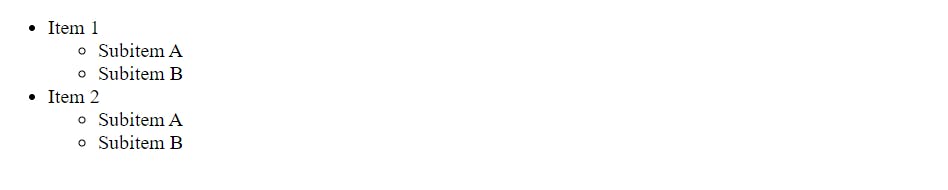
1. Descendant Selector:
The descendant selector in CSS is used to match all elements that are descendants of a specified element.
Syntax
selector1 selector2 { /* property declarations */ }
Example -->
HTML:
<ul>
  <li>
    <div>Item 1</div>
    <ul>
      <li>Subitem A</li>
      <li>Subitem B</li>
    </ul>
  </li>
  <li>
    <div>Item 2</div>
    <ul>
      <li>Subitem A</li>
      <li>Subitem B</li>
    </ul>
  </li>
</ul>
CSS:
li {
  list-style-type: disc;
}

li li {
  list-style-type: circle;
}
OUTPUT -->
2. Child Selector:
The child selector is used to select all elements as immediate children of a specified element.
Syntax
selector1 > selector2 { style properties }
Example -->
HTML:
<div>
  <span>Span #1, in the div.
    <span>Span #2, in the span that's in the div.</span>
  </span>
</div>
<span>Span #3, not in the div at all.</span>
CSS:
span {
  background-color: aqua;
}

div > span {
  background-color: yellow;
}
OUTPUT -->

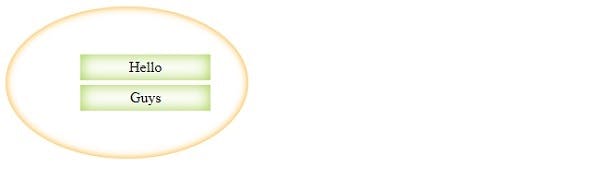
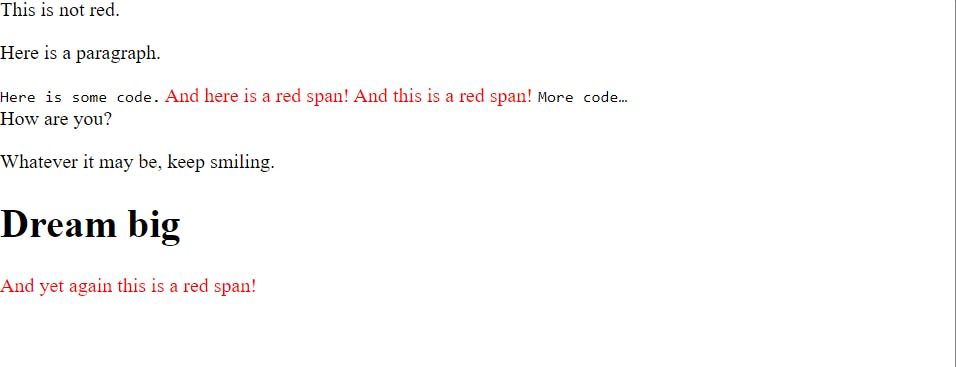
3. General Sibling Selector:
The general sibling combinator (~) separates two selectors and matches all iterations of the second element, that are following the first element (though not necessarily immediately), and are children of the same parent
Syntax
former_element ~ target_element { style properties }
Example -->
HTML:
<span>This is not red.</span>
<p>Here is a paragraph.</p>
<code>Here is some code.</code>
<span>And here is a red span!</span>
<span>And this is a red span!</span>
<code>More code…</code>
<div> How are you? </div>
<p> Whatever it may be, keep smiling. </p>
<h1> Dream big </h1>
<span>And yet again this is a red span!</span>
CSS:
p ~ span {
  color: red;
}
OUTPUT -->
4. Adjacent Sibling Selector:
The adjacent sibling combinator (+) separates two selectors and matches the second element only if it immediately follows the first element, and both are children of the same parent element.
Syntax
former_element + target_element { style properties }
Example -->
HTML:
<ul>
  <li>One</li>
  <li>Two!</li>
  <li>Three</li>
</ul>
CSS:
li:first-of-type + li {
  color: red;
}
OUTPUT -->

Pseudo Selectors
The :: pseudo represent entities that are not included in HTML.
Syntax
selector:pseudo-element { property: value; }
Example -->
1. Before:
<html>
   <head>
      <style>
         p::before
         {
            content: url(/images/bullet.gif)
         }
      </style>
   </head>
   <body>
      <p> This line will be preceded by a bullet.</p>
      <p> This line will be preceded by a bullet.</p>
      <p> This line will be preceded by a bullet.</p>
   </body>
</html>
2. After:
<html>
   <head>
      <style>
         p::after
         {
            content: url(/images/bullet.gif)
         }
      </style>
   </head>
   <body>
      <p> This line will be preceded by a bullet.</p>
      <p> This line will be preceded by a bullet.</p>
      <p> This line will be preceded by a bullet.</p>
   </body>
</html>